How to Build a Gaming PC: Your Ultimate DIY Guide
build gaming PC

How to Build a Gaming PC: Your Ultimate DIY Guide

Unlock unparalleled gaming performance and complete customization by building your own powerful gaming rig.

Start Building Your Dream PC

Key Takeaways

  • ✓ Building a PC offers better performance-to-price ratio than pre-builts.
  • ✓ Component compatibility is crucial for a successful build.
  • ✓ Static electricity can damage sensitive components; take precautions.
  • ✓ Cable management improves airflow and aesthetics.

How It Works

1
Plan Your Build & Gather Components

Research and select compatible parts based on your budget and performance goals. Acquire all necessary components before starting assembly.

2
Assemble Core Components

Install the CPU, cooler, RAM, and M.2 SSD onto the motherboard. This pre-assembly simplifies installation into the case.

3
Integrate into Case & Power Up

Mount the motherboard, graphics card, and power supply into the PC case. Connect all necessary power and data cables.

4
Install OS & Drivers

Boot your new PC, install your operating system (Windows or Linux), and then download and install all relevant drivers for your hardware.

Understanding Gaming PC Components

Close-up of an advanced gaming desktop PC with GeForce RTX, liquid cooling, and RGB lighting. 
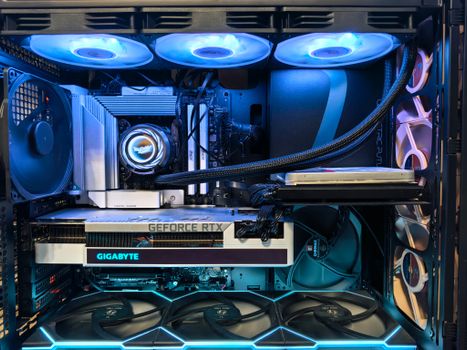
Photo: Andrey Matveev / Pexels
Embarking on the journey of building your own gaming PC begins with a thorough understanding of its fundamental components. Think of each part as a vital organ working in concert to bring your games to life. The Central Processing Unit (CPU) is the 'brain' of your computer, responsible for executing instructions and performing calculations. For gaming, you'll want a CPU with a good balance of core count and clock speed. Popular choices often come from Intel (e.g., Core i5, i7, i9) and AMD (e.g., Ryzen 5, 7, 9), each offering distinct advantages in terms of price, performance, and platform features. Compatibility with your chosen motherboard is paramount here, as different CPUs require specific sockets. Next, the Graphics Processing Unit (GPU), or graphics card, is arguably the most critical component for gaming performance. It renders images, videos, and animations, directly impacting frame rates and visual fidelity. NVIDIA's GeForce RTX series and AMD's Radeon RX series dominate the market, offering a range of cards from budget-friendly options to high-end powerhouses. Your choice here will largely dictate what resolutions and frame rates you can achieve in your favorite games. Don't skimp on the GPU if gaming is your primary objective; it's often the single largest investment in a gaming PC build. The Motherboard acts as the central nervous system, connecting all your components. It dictates what CPU, RAM, and storage types are compatible, and provides ports for peripherals. Look for a motherboard with sufficient PCIe slots for your GPU, enough RAM slots for future upgrades, and appropriate USB and M.2 NVMe slots for storage. Different chipsets offer varying features and overclocking capabilities, so research is key. Random Access Memory (RAM) is your system's short-term memory, allowing fast access to data the CPU needs immediately. For gaming, 16GB is generally considered the sweet spot, with 32GB providing more headroom for multitasking or future-proofing. Look for DDR4 or the newer DDR5 modules, ensuring compatibility with your motherboard and CPU. Higher clock speeds (MHz) and lower CAS Latency (CL) generally translate to better performance. Storage is where your operating system, games, and files reside. Solid State Drives (SSDs), particularly NVMe M.2 drives, offer significantly faster load times and overall system responsiveness compared to traditional Hard Disk Drives (HDDs). While HDDs still offer large capacities at a lower cost, an NVMe SSD for your OS and primary games is highly recommended. Many builders opt for a combination: a smaller, fast NVMe SSD for the OS and a few core games, paired with a larger SATA SSD or HDD for mass storage. The Power Supply Unit (PSU) provides electricity to all your components. It's crucial not to underestimate its importance. A reliable PSU ensures stable power delivery and protects your expensive components. Calculate your estimated wattage needs based on your CPU and GPU, then add a buffer (e.g., 100-150W) for safety and future upgrades. Look for PSUs with 80 PLUS certification (Bronze, Gold, Platinum, Titanium) which indicates energy efficiency. Modular or semi-modular PSUs offer better cable management. Finally, the PC Case houses all these components. Beyond aesthetics, consider its size (ATX, Micro-ATX, Mini-ITX), airflow capabilities, and cable management options. A well-ventilated case with good fan placement is essential for keeping temperatures in check, especially during intense gaming sessions. Don't forget a CPU Cooler, especially if your CPU doesn't come with one or if you plan to overclock. Air coolers are generally more affordable and reliable, while AIO (All-in-One) liquid coolers offer superior cooling performance and aesthetics. Understanding these core components is the first, crucial step in building a high-performance gaming PC that meets your specific needs and budget.

Planning Your Gaming PC Build and Budgeting

Close-up of a custom-built RGB gaming PC showcasing vibrant lighting and high-performance components. Photo: Gibson Chan / Pexels
Before you even think about ordering parts, meticulous planning is paramount. This phase involves setting a realistic budget and defining your performance goals. Your budget will largely dictate the caliber of components you can acquire. Are you aiming for 1080p gaming at 60 frames per second (fps), or are you targeting buttery-smooth 1440p or even 4K gaming at high refresh rates? Different resolutions and frame rates demand significantly different levels of hardware. For instance, a system capable of 4K gaming will require a much more powerful (and expensive) GPU and CPU than one designed for entry-level 1080p gaming. Start by allocating a rough percentage of your budget to each major component. Typically, the GPU will consume the largest portion (30-40%), followed by the CPU (15-25%), then the motherboard, RAM, storage, PSU, and case each taking smaller, but significant, slices. Don't forget to factor in the cost of an operating system (Windows often being the default for gaming), peripherals (monitor, keyboard, mouse), and potentially a new chair or desk if you're upgrading your entire setup. While it might be tempting to splurge on one high-end component, maintaining balance across your build is crucial. A powerful GPU paired with a weak CPU (a bottleneck) will not deliver its full potential, and vice-versa. Similarly, a top-tier CPU and GPU deserve adequate RAM and fast storage to avoid performance hitches. Researching component compatibility is a non-negotiable step. Use online PC building tools like PCPartPicker.com, which can automatically check for compatibility issues between selected components. This will save you countless headaches down the line. It's not just about socket types; it’s also about RAM speed compatibility with your motherboard and CPU, PSU wattage sufficiency, and physical clearances within your chosen case (e.g., GPU length, CPU cooler height). Reading reviews and watching build guides for similar configurations can also provide invaluable insights into potential pitfalls or unexpected quirks. Consider future-proofing to an extent, but don't overspend on components you won't fully utilize in the short term. For example, opting for a motherboard with extra RAM slots or M.2 slots can make future upgrades easier. Choosing a PSU with a bit more wattage than your current needs allows for a more powerful GPU upgrade later. However, technology evolves rapidly, so extreme future-proofing can be a waste of money. Aim for a system that meets your current needs with some room to grow. This planning phase, though less hands-on, is arguably the most critical for a successful and satisfying build. It lays the groundwork for a smooth assembly process and ensures your final gaming PC aligns perfectly with your expectations and budget. Skipping this step often leads to compatibility issues, budget overruns, or a gaming experience that falls short of your dreams. Take your time, do your homework, and plan meticulously before you start acquiring parts. This foundational step ensures a rewarding and efficient custom PC building experience.

Step-by-Step Assembly: Bringing Your Vision to Life

Close-up of a hand unscrewing a desktop computer case, emphasizing technology maintenance. 
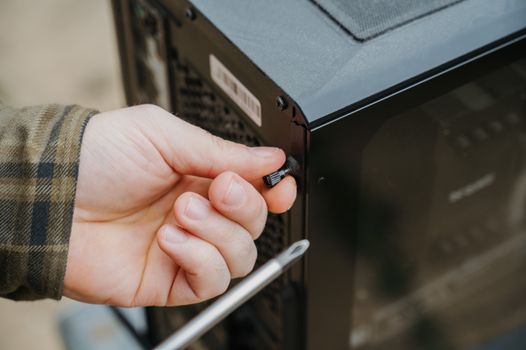
Photo: Anete Lusina / Pexels
With all your components acquired and your plan in place, it's time for the exciting part: assembly. Before you begin, ensure you have a clean, static-free workspace. A large, well-lit table is ideal. Gather your tools: a Phillips head screwdriver (magnetic tip is a bonus), zip ties or Velcro straps for cable management, and thermal paste (if your CPU cooler doesn't come pre-applied). It's also highly recommended to use an anti-static wrist strap, or at least frequently touch a grounded metal object (like your PC case) to discharge any static electricity that could damage sensitive components. Start by preparing the Motherboard. Carefully unbox it and place it on its anti-static bag on your workspace. This is the easiest time to install the CPU. Open the CPU socket lever, align the triangular arrow on your CPU with the corresponding mark on the socket, and gently drop the CPU into place. Do not force it. Once seated, close the lever to secure it. Next, install the CPU Cooler. If it’s an air cooler, apply a small pea-sized dot of thermal paste to the center of the CPU (unless pre-applied) and then mount the cooler according to its instructions. For AIO liquid coolers, mount the pump block to the CPU and the radiator to your case later. After the CPU and cooler, install the RAM. Open the clips on the RAM slots, align the notch on the RAM stick with the slot, and press down firmly on both ends until the clips snap into place. Refer to your motherboard manual for the correct slots to use for dual-channel memory (usually slots 2 and 4). Now, install your M.2 NVMe SSDs onto the motherboard. These typically slot into dedicated M.2 slots and are secured with a small screw. Once these core components are on the motherboard, it’s time to install the Motherboard into the PC Case. First, install the I/O shield (if not integrated with the motherboard) into the case's rear opening. Then, carefully lower the motherboard into the case, aligning it with the standoff screws. Secure it with screws, ensuring a snug fit. Next comes the Power Supply Unit (PSU). Mount the PSU into its designated bay in the case, usually at the bottom rear. Connect the necessary modular cables to the PSU before installing it, if applicable, as it can be harder to do once it's in the case. Ensure the fan is facing the correct direction (often downwards if there's a vent, or upwards if not). The Graphics Card (GPU) is next. Locate the primary PCIe x16 slot on your motherboard (usually the top one). Open the retention clip on the slot. Carefully align the GPU with the slot and push down firmly until it clicks into place. Secure the GPU to the case with screws, typically one or two at the back. Connect the necessary PCIe power cables from your PSU to the GPU. Finally, connect all the remaining cables: the 24-pin ATX power cable to the motherboard, the 8-pin (or 4+4-pin) CPU power cable, SATA power and data cables for any additional SSDs/HDDs, and front panel connectors (USB, audio, power/reset buttons, LEDs). This last step requires careful attention to your motherboard manual, as these small connectors are crucial and can be confusing. Once everything is connected, perform initial cable management to improve airflow and aesthetics. Don't worry if it's not perfect initially; you can refine it later. Double-check all connections before attempting your first boot. This meticulous approach ensures a successful build and a fully functional, high-performing gaming PC. For more details on component installation, consider checking out specific component installation guides.

First Boot, Software, and Optimizing Your Gaming Experience

Detailed view of electronic components on a computer motherboard focusing on connectors and capacitors. 
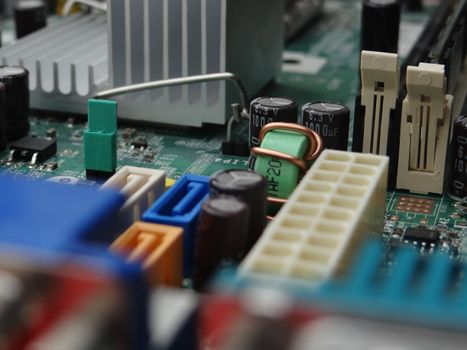
Photo: Djenz Van Eysendeyk / Pexels
The moment of truth arrives after assembly: the first boot. Before powering on, double-check all connections – especially the 24-pin and 8-pin CPU power, GPU power, and RAM seating. Connect your monitor, keyboard, and mouse. Press the power button on your case. If all goes well, your fans will spin up, and you'll see a signal on your monitor, likely taking you to the motherboard's BIOS/UEFI screen. If nothing happens, don't panic. Troubleshoot by re-seating components, checking power connections, and ensuring your monitor is on the correct input. Many motherboards have diagnostic LEDs or codes that can help pinpoint issues. Once in the BIOS, you may need to adjust a few settings. Ensure your boot drive (the M.2 NVMe SSD where you'll install your OS) is recognized. Enable XMP/DOCP for your RAM to run at its advertised speeds, as it often defaults to a lower speed. Save and exit the BIOS. Now, it's time to install your Operating System. For most gamers, this will be Windows. Create a bootable USB drive with the Windows installation media (using Microsoft's Media Creation Tool on another computer). Insert the USB, restart your PC, and boot from the USB drive. Follow the on-screen prompts to install Windows on your chosen SSD. After Windows is installed, the next critical step is installing all necessary Drivers. Drivers are software that allows your operating system to communicate with your hardware. Start with your motherboard chipset drivers, which can be found on your motherboard manufacturer's website. Then, install your GPU drivers directly from NVIDIA or AMD's website – these are crucial for gaming performance. Don't rely on Windows Update for these; get the latest official drivers. Install drivers for any other peripherals or components that require them (e.g., Wi-Fi adapter, specific audio drivers). Keeping your GPU drivers up-to-date is essential for optimal gaming performance and stability. Finally, it's time to Optimize Your Gaming Experience. Install your favorite games and benchmarks. Monitor your CPU and GPU temperatures and clock speeds using software like HWMonitor or MSI Afterburner to ensure everything is running within safe limits. Adjust in-game settings to find the best balance between visual quality and frame rate for your specific hardware. Consider overclocking your CPU or GPU for extra performance, but only if you're comfortable with the risks and have adequate cooling. Good cable management, even after the build, can improve airflow and reduce dust buildup. Regularly clean your PC to maintain optimal performance. A well-built and optimized PC will provide countless hours of immersive gaming, justifying the effort you put into its creation. Enjoy the fruits of your labor – your custom-built gaming machine is ready to conquer new worlds. Learning how to build a gaming PC means you're in control of your destiny, and now you have the power to fine-tune it to perfection.

Comparison

FeatureDIY Gaming PCPre-built Gaming PC (Budget)Pre-built Gaming PC (High-End)
Cost-EffectivenessExcellent (more performance per dollar)Good (convenience factor)Fair (premium for convenience & warranty)
CustomizationUnlimited (choose every part)Limited (fixed configurations)Limited (some configurable options)
UpgradeabilityExcellent (standardized parts)Moderate (may have proprietary parts)Moderate (may have proprietary parts)
Learning ExperienceHigh (gain valuable skills)None (plug and play)None (plug and play)
TroubleshootingRequires user knowledgeManufacturer supportManufacturer support
Performance PotentialHighest (optimized parts)Good (balanced for price)Very High (top-tier components)
WarrantyIndividual component warrantiesSingle system warrantySingle system warranty

What Readers Say

"This guide was a lifesaver! I always thought building a gaming PC was too complicated, but following these steps made it surprisingly straightforward. My new PC runs all my games flawlessly."

Alex R. · Austin, TX

"I used this article to plan my first build, and it covered everything from component selection to driver installation. The budgeting advice was particularly helpful in keeping me on track without sacrificing performance."

Sarah J. · Seattle, WA

"After reading this, I successfully built my dream gaming rig. I saved hundreds compared to a pre-built and got exactly the components I wanted. Frame rates are consistently high, and I couldn't be happier."

Mark T. · Miami, FL

"The guide is incredibly thorough, though I did need to watch a few YouTube videos for the fiddly front panel connectors. Overall, a fantastic resource that gave me the confidence to tackle this project."

Jessica L. · Denver, CO

"As someone who builds PCs professionally, I can attest to the accuracy and depth of this guide. It breaks down complex processes into easy-to-understand steps, perfect for beginners and a great refresher for experienced builders."

Ben K. · Chicago, IL

Frequently Asked Questions

Is it really cheaper to build a gaming PC than to buy a pre-built one?

Generally, yes. Building a gaming PC often provides a better performance-to-price ratio because you're not paying for assembly labor or a brand premium. You can also allocate your budget precisely to the components that matter most to you, avoiding unnecessary upgrades found in pre-configured systems. The savings can range from 10-30% for comparable performance.

What if I accidentally break a component during assembly?

While unlikely if you're careful, component damage is a common concern. Most new components come with warranties, but accidental physical damage might not be covered. Always handle parts gently, follow anti-static precautions, and consult your motherboard manual. If a part seems faulty, contact the manufacturer for RMA (Return Merchandise Authorization) before attempting repairs yourself.

How do I ensure all my components are compatible?

The best way to ensure compatibility is by using online PC building tools like PCPartPicker.com. These tools allow you to select components and automatically flag potential conflicts like incompatible CPU sockets, insufficient PSU wattage, or RAM speed mismatches. Always double-check your motherboard's QVL (Qualified Vendor List) for RAM compatibility.

How much should I spend on a gaming PC?

The cost of a gaming PC can vary wildly, from $700 for an entry-level 1080p system to over $3000 for a high-end 4K machine. A mid-range build (around $1200-$1800) typically offers excellent 1080p/1440p performance. Define your gaming resolution and desired frame rates first, then allocate your budget accordingly, prioritizing the GPU and CPU.

Is building a gaming PC difficult for a beginner?

Not as difficult as you might think! While it requires patience and attention to detail, modern components are designed to be user-friendly. With comprehensive guides like this one, instructional videos, and online resources, a beginner can absolutely succeed. The process is often described as 'adult LEGOs' and is incredibly rewarding.

Who should consider building their own gaming PC?

Anyone looking for maximum performance for their budget, complete control over their system's components, and the satisfaction of a DIY project should consider building. It's also ideal for those who want a deeper understanding of computer hardware, easy future upgradeability, and a unique, personalized gaming machine.

What are the risks associated with static electricity during a PC build?

Static electricity (ESD) can discharge into sensitive electronic components, causing immediate or latent damage. While modern components are more resilient, it's still a risk. Always work on a non-carpeted surface, use an anti-static wrist strap connected to a grounded object (like your PC case's metal frame), and avoid shuffling your feet or wearing wool clothing.

What future trends should I be aware of when building a gaming PC?

Keep an eye on advancements in CPU and GPU architectures (e.g., new generations from Intel, AMD, NVIDIA), the transition to DDR5 RAM and PCIe 5.0, and the increasing adoption of NVMe SSDs. Cooling solutions are also evolving, with more efficient air coolers and AIOs. Planning for these trends can help ensure your build remains relevant longer, but don't obsess over the absolute bleeding edge.

Ready to ditch pre-builts and experience the thrill of a custom machine? By following this comprehensive guide on how to build a gaming PC, you're not just assembling parts; you're crafting a personalized powerhouse tailored to your exact gaming needs. Take the leap – your ultimate gaming experience awaits.

Topics: build gaming PCDIY computer buildgaming PC componentscustom gaming desktopPC building guide
Leo List
Brampton weed
Adultwork